
I've read the forum posting on how to override the popup template. What I am trying to figure out is how to adjust the popup origin. The default template has the popup appearing below and to the right of where the mouse was clicked. I would like it above and to the right. I saw an example in the Web version, but it doesn't work in WPF. Any suggestions?
Custom Popup Styling
Thomas,
Please check the HowDoISample DetermineTheAreaOfAnAreaFeature, also if you want to set the popup's origin, please refer the following code:
popup.HorizontalAlignment = System.Windows.HorizontalAlignment.Left;
popup.VerticalAlignment = System.Windows.VerticalAlignment.Top;
Any more questions please let me know,
Thanks,
Scott,
I looked at that sample and the only relevant piece of code has to do with how to add a popup. I have retemplated the popup based on a post Howard made. I tried the alignment suggestion and it had no affect on the popup. Because I can't seem to add XAML I have attached a text file with my xaml file. <local:htmlToFlowDocConverter x:Key="htmlToFlowDocConverter"/> <Style TargetType="{x:Type local:KMLInfoPopup}"></font> <!--<Setter Property="Margin" Value="0, -120, 0, 0"/>--> <Setter Property="Template"> <Setter.Value> <ControlTemplate TargetType="{x:Type local:KMLInfoPopup}"> <Canvas x:Name="popupContainer" Opacity="0"> <Canvas.Triggers> <EventTrigger RoutedEvent="Canvas.Loaded"> <BeginStoryboard> <Storyboard x:Name="PopupStory"> <DoubleAnimation Duration="0:0:1" Storyboard.TargetName="popupContainer" Storyboard.TargetProperty="Opacity" From=".0" To="1"></DoubleAnimation> </Storyboard> </BeginStoryboard> </EventTrigger> </Canvas.Triggers> <Border x:Name="popupBorder" Width="{TemplateBinding Width}" Height="{TemplateBinding Height}" BorderBrush="{TemplateBinding BorderBrush}" BorderThickness="{TemplateBinding BorderThickness}" CornerRadius="10" Padding="4" Background="{TemplateBinding Background}"> <ContentControl> <FlowDocumentScrollViewer x:Name="Browser" Document="{Binding Path=HTML, Converter={StaticResource htmlToFlowDocConverter}}"/> </ContentControl> </Border> <Polyline x:Name="popupArrow" Fill="{TemplateBinding Background}" Points="40,69 35,88 60,69" Stroke="{TemplateBinding BorderBrush}" StrokeThickness="{TemplateBinding BorderThickness}" /> </Canvas> </ControlTemplate> </Setter.Value> </Setter> </Style>
<local:htmlToFlowDocConverter x:Key="htmlToFlowDocConverter"/>
<Style TargetType="{x:Type local:KMLInfoPopup}">
<!--<Setter Property="Margin" Value="0, -120, 0, 0"/>-->
<Setter Property="Template">
<Setter.Value>
<ControlTemplate TargetType="{x:Type local:KMLInfoPopup}">
<Canvas x:Name="popupContainer" Opacity="0">
<Canvas.Triggers>
<EventTrigger RoutedEvent="Canvas.Loaded">
<BeginStoryboard>
<Storyboard x:Name="PopupStory">
<DoubleAnimation Duration="0:0:1" Storyboard.TargetName="popupContainer" Storyboard.TargetProperty="Opacity" From=".0" To="1"></DoubleAnimation>
</Storyboard>
</BeginStoryboard>
</EventTrigger>
</Canvas.Triggers>
<Border x:Name="popupBorder" Width="{TemplateBinding Width}" Height="{TemplateBinding Height}" BorderBrush="{TemplateBinding BorderBrush}" BorderThickness="{TemplateBinding BorderThickness}" CornerRadius="10" Padding="4" Background="{TemplateBinding Background}">
<ContentControl>
<FlowDocumentScrollViewer x:Name="Browser" Document="{Binding Path=HTML, Converter={StaticResource htmlToFlowDocConverter}}"/>
</ContentControl>
</Border>
<Polyline x:Name="popupArrow" Fill="{TemplateBinding Background}" Points="40,69 35,88 60,69" Stroke="{TemplateBinding BorderBrush}" StrokeThickness="{TemplateBinding BorderThickness}" />
</Canvas>
</ControlTemplate>
</Setter.Value>
</Setter>
</Style>
derivedpopup.txt (1.9 KB)
Thomos,
I’m working on it and looking for a solution for you, if it is possible I will answer you tomorrow, it needs times to have a investigation,
Thanks,
Scott,
Hi Thomas,
In your first post, you mentioned that “The default template has the popup appearing below and to the right of where the mouse was clicked”.
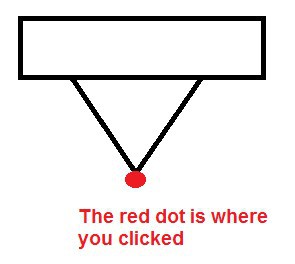
But I don’t think that’s true, by default the popup appears right above the point where you clicked.
It’s like this:
I guess you experienced the “below and to the right” behavior because you override the OnApplyTemplate method.
And you said that you’d like it “above and to the right”, did you mean like this?
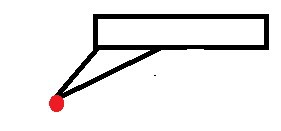
If that is the case, then I’d suggest you to the following:
1. Change your customized control template a little bit, make the polyline’s points to be “0,0 -5,19 20,0”. This is easier to calculate.
2. Change your KMLInfoPopup class,
public class KMLInfoPopup : Popup
    {
        private Polyline arrow;
        private Border border;

        public override void OnApplyTemplate()
        {
            arrow = (Polyline)GetTemplateChild("popupArrow");
            border = (Border)GetTemplateChild("popupBorder");


            if (arrow != null && border != null)
            {
                border.Measure(new Size(double.PositiveInfinity, double.PositiveInfinity));
                arrow.SetValue(Canvas.TopProperty, border.DesiredSize.Height);

                double marginLeft = 5;
                double marginTop = -(border.DesiredSize.Height + ArrowHeight);
                Margin = new Thickness(marginLeft, marginTop, 0, 0);
            }
        }
    }
Please let us know if this helps.
Regards
That did help with the placement of the callout arrow. However, the poup still seems to have the worldlocation as its top left corner. Please see attached screenshot.
Thomas,
According to my test I believe the pop is on the top right corner, I didn’t see your screen shot, can you attach it again?
Thanks,
Scott,
I've tried attaching it again. It seems like the uploader isn't recognizing the file because I used capture.png. I imagine there are MANY capture.png files on the server which revealed a bug.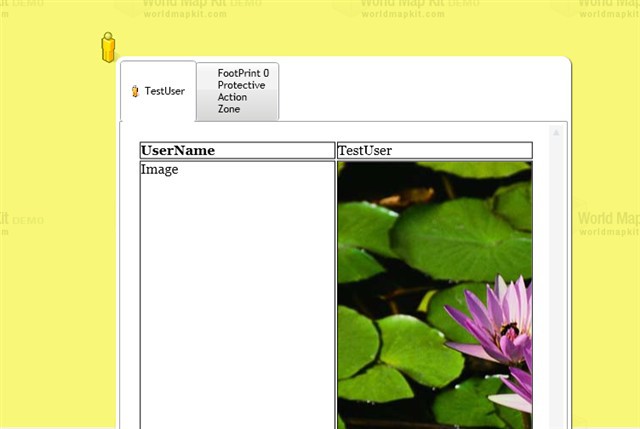
Thomas,
It seems the popup was on the bottom right corner, you meant you want it to on the top right corner? The code what I provided to you implemented it and I gave you the screen shot, so can you arrange a simple sample to us and find out the exact reason.
Thanks,
Scott,
Hi Thomas,
I tried the code, and this is the result that I got from it:
We can see that the popup appeared above and to the right of the point I clicked.
We don’t have the code that converts HTML to flow document, so I replace the main content with a simple image. I’d expect it to behave in the same way when the content is a flow document.
Right now we only have your customized control template and the screenshot, these are not sufficient for us to figure out how to solve the problem.
It’ll be great if you can attach a sample that produces the problem in your next post.
Regards,
Tsui
The code you suggested I try was mostly correct in the OnApplyTemplate. The problematic line was the Margin = new Thickness(marginLeft, marginTop, 0, 0); This did not actually adjust the margin, so I was not seeing any change in popup position. I got the container template child:
GetTemplateChild("popupContainer")
and then set the margin of that to the new Thickness. This seems to move the popup like you described. Thanks for your direction and guidance in this issue!
Thomas,
Glad that you can make it work now.
Any more questions just tell us.
Regards,
Gary
I’m trying to style a popup so that it has round corners much like in the screen shots above. What’s happening instead is the rounded border appears inside the square popup box. Can I achieve this without overriding the popup? Here is my XAML:
<ContentControlx:Key=“labelPopup”Height=“55”Width=“140”Loaded=“LabelContentControl_Loaded”><BorderBackground=“LightBlue”CornerRadius=“10”BorderBrush=“Black”BorderThickness=“1”><GridMargin=“1”><Grid.RowDefinitions><RowDefinitionHeight=“Auto”/><RowDefinitionHeight=“Auto”/>Grid.RowDefinitions><GridGrid.Row=“0”><TextBoxx:Name=“txtLabel”Margin=“3”TabIndex=“1”/>Grid><GridGrid.Row=“1”><Buttonx:Name=“btnSaveLabel”Content=“Save”HorizontalAlignment=“Left”Margin=“1,2,0,0”Width=“50”TabIndex=“2”Click=“btnSaveLabel_Click”>Button><Buttonx:Name=“btnCancelLabel”HorizontalAlignment=“Left”Margin=“60,2,1,0”Content=“Cancel”Width=“50”TabIndex=“2”Click=“btnCancelLabel_Click”>Button>Grid>Grid>Border>ContentControl>
Thanks in advance,
Chad
Hi, Chad
If you only want popup box has rounded border. It doesn’t
have to override the popup class. We can use Loaded Event on Popup.
....Popup popup = new Popup(item.GetShape().GetCenterPoint());popup.Loaded += new RoutedEventHandler(popup_Loaded);popup.Content = new PopUpContentControl();// this is your content control.popUpOverlay.Popups.Add(popup);.....
void popup_Loaded(object sender, RoutedEventArgs e){Popup p = sender as Popup;Border b = p.Template.FindName("BorderTemplate", p) as Border;b.CornerRadius = new CornerRadius(10);}
Please check the codes and see if this is what you want.
Thanks,
Johnny
Hi Johnny,
That did the trick. Also, for those interested I got the following code to animate the popup displaying using a scale transform:
DimpAsPopup = m_oPopupOverlay.Popups(0)DimborderAsBorder = p.Template.FindName("BorderTemplate", p)border.CornerRadius =NewCornerRadius(10)DimsbAsNewStoryboard()DimstAsNewScaleTransform(1, 1)p.RenderTransformOrigin =NewSystem.Windows.Point(1, 1)p.RenderTransform = stDimdaXAsNewDoubleAnimation()daX.Duration = TimeSpan.FromMilliseconds(150)daX.From = 0daX.To= 1sb.Children.Add(daX)DimdaYAsNewDoubleAnimation()daY.Duration = TimeSpan.FromMilliseconds(150)daY.From = 0daY.To= 1sb.Children.Add(daY)Storyboard.SetTargetProperty(daX,NewPropertyPath("RenderTransform.ScaleX"))Storyboard.SetTargetProperty(daY,NewPropertyPath("RenderTransform.ScaleY"))Storyboard.SetTarget(daX, p)Storyboard.SetTarget(daY, p)sb.Begin()
Hi Chad,
Thanks for your codes sharing and it looks nice.
I am afraid this is decided by WPF design after some investigations as the popup control is inherited from ContentControl and the border is from a ControlTemplate in styles. Without registering the events, we can’t find the border ControlTemplate based on some tests.
If any other questions, don’t hesitate to let us know.
Thanks,
Johnny
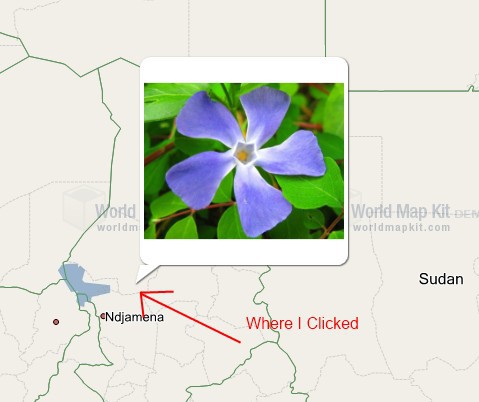
I am looking over this post and am trying to put the popup call-out box off to the side. I have it generating off to the side, but the arrow isn’t pointing to the correct location.
I saw another person posted about finding the popup’s container to adjust its margin. However, I haven’t been able to find that container to edit it.
Look at my attached screenshot and let me know what I need to do to get the arrow to point to the correct feature. It looks like my internal box is correct but not the container.
I am also wondering if there is a way to change the format/color of the popup through that section of code instead of going through the XAML? For instance, if I wanted to customize the appearance by feature or something.
More precisely, I am looking how to edit the x/y and the appearance of the arrow part of the popup box.
Hi Brandon,
Since you have created a new thread on it, let’s refer and answer on there.
http://community.thinkgeo.com/t/updating-popup-arrow-xy/3651
Thanks,
Troy